Is there such a thing as a too big worktable?

It may surprise you, but the answer is yes. Hear me out.

I had a giant table in the garage that never used to get used because it was *gasp* too big. It got shoved into it’s space in the back corner of the garage, took up a ton of space and stayed covered in crap and couldn’t easily be moved to a new location to actually be used anyway…so it didn’t. It just stayed covered in crap and then when I needed a flat surface, I resorted to my plastic sawhorses with a piece of scrap plywood on top that’s less than ideal and hard to move around once it’s set up and covered with the current project. So when a Kansas storm rolled in and I wanted to park my car in the garage, I couldn’t.

In my sewing room, I have one of those J-A craft tables with the big rotary mat, and it’s kind of the same way. Sometimes that table holds all the stuff I don’t have good storage solutions for and then I can’t use it when I want to cut out a project without a major reorganization that generally involves shoving crap onto the floor or whatever.

A year or so ago, I spent the entire summer working on cleaning out and creating organization in the garage. I cut down that giant table that was always relegated to the back corner, and put on a bunch of onboard storage. We’ve used that table a TON since then. It’s so handy, and it still is a huge table–3.5 ft x 6ft, instead of the full 4ft x 8ft–but it’s on good casters, has a full set of drawers on one end with full extension slides, and a shelf underneath that holds toolboxes and the shopvac. I put magnet strips on 3 sides to hold small pieces mid project so they don’t have to sit on top and get knocked off or roll away. It’s not perfect, but I’m really happy with how useful it is now.

Ever since then, I’ve been thinking about how to fix my sewing room table too. I don’t know that I want the table to be smaller, because it fits my big cutting mat perfectly, but some additional storage options would be hugely beneficial. So I’ve been looking on the internet, as you do, and have found a couple of options from Ana White that I think will make my space less cluttered and more functional.

https://www.ana-white.com/woodworking-projects/craft-table-top-modular-collection

For me, the current winner is this one, but she has others that might also be good too, depending on your space. Now I just need to gather the supplies and get to building.

In the meantime, if you have suggestions on storing PDF pattern pieces printed on regular paper and taped/glued together I’m looking for a solution, rolling them into tubes isn’t working all that well. The glued pieces come apart, and the taped pieces can’t be ironed with enough heat to get the curl out. I’d love to do the projector thing and do away with pdf printed patterns altogether, but that’s not looking like a solution I can afford at present.

The super simple project that nearly killed me

If you look through my old stuff, I’ve sewn many things (and most of them not blogged, because I’m a bad blogger) and I’ve tried many different challenging things over the years. Tailored shirts with cuffs and collars (sometimes on shifty fabrics), lingerie, and so much rayon challis. So why on earth was a hem on a pair of double gauze baby blankets nearly the end of me?! I have no clue. It’s all kinds of wonky by my normal standards, but as the shower for the baby is tomorrow, they will have to do. It doesn’t matter, they are still super cute, and will be a nice weight for keeping baby warm in excessive A/C and protected from the brutal July and August sun.

Obviously the woodland animals are my favorite. 💚

Inspired to try again…

I’ve been reading the Dr T Designs blog, and she’s been sewing bras. I *have* successfully sewn bras before, but they weren’t something I enjoyed sewing, and were never really my style. Assuming you can call what I have a “style”. But the brand and style I’ve been buying isn’t working anymore; not sure if they’ve changed or if I have, but the band is too big, the cups are too small, yet the next size down in the band is too tight and the cups+wires are too wide. So I’m going to have to do something different, and I have more fit knowledge than I did the last time I gave it a go, so maybe it will work better this time. I have a bunch of goodies on their way to me from bra builders and some wires coming from Porcelynne, so 🤞. Plus I’ve binge watched all the bra sewing youtubes, so I feel more confident, for whatever that’s worth. I may even end up with a matching set, since I finally got around to making more undies (until I ran out of elastic, one pair in. 🤦‍♀️🤷‍♀️) I used an old stretch and sew pattern (2051) and finally figured out how to make the view with the crossover V front (View I). They are cute on (you’ll have to take my word on this), but the elastic is super bubbly, so they aren’t as pretty when flat. I’ll add more length to the elastic next time. I think an extra inch will make a world of difference.

Shown with the fabric I used to make them.

Singer Sphinx 27/127 Restoration 3

She’s apart!
Drivetrain!

So I finally figured out how to get this machine’s “drivetrain” out. All it took was a map gas torch (that I finally broke down and bought this past week), a BFH (big effing hammer 😉), and some patience. I figured it was along those lines, but I was so worried about breaking the casting I was scared to try it. Then I saw a YouTube video from a channel called NATRA. I’ll try to link it, but no promises it’ll be a good link forever.

That video also showed me that you can take the head off of the base. I had no idea. I mean, it makes sense now that I’ve done it, because the casting would be awfully complicated in one solid go, but I’d never seen anyone take the base off before. The more you know, or something. That part actually came apart easier than I expected. There are three screws on the bottom that hold it on, and a couple of pins that line it up. Give’er a little heat, a couple shots with an impact driver, and voila! I barely tapped it with the rubber mallet, and it popped right off. Now she’s ready to be cleaned, stripped, and painted.

For the paint, and this is going to be controversial, but it’s my machine that I’m saving from the metal recycling, and I’ll do as I please. So…

She’s gonna be metallic teal. I love the way teal and gold look together, so it’s a no brainer. It’s also the only time I like the look of gold, as I’m more of a silver/chrome gal myself. The only thing left to decide is whether she’s going to be reborn as a Sphinx or if she’s going to get the art deco decals. I really like both, and either way she will be beautiful. I do lean toward those ungodly expensive Sphinx decals though, because…well, I’ve always been fascinated by the Sphinx, and I don’t want to erase all of her history.

Getting back to my roots…

With Butterick 6494.

Does anyone else remember Jungle January? It was so long ago, but I still miss it sometimes. In fact, the fabric I used for this pattern came from the last swap done for Jungle January that I participated in, and possibly the last one period. I’ve looked at it for years and never had quite the right project for it. Until I found Butterick 6494 for “heavy” knits.

I’m still not 100% sure what this fabric is, it’s sort of like a sweater knit, or maybe it’s a Ponte (I don’t have enough Ponte experience to know for sure), but it sewed up like a dream. I also had a lot of it, which was good, because I cut view B out twice…once with the stretch in the wrong direction, and once with it going the right direction (why do they make a few fabrics with the stretch going only vertically instead of from selvage to selvage?!). 🤦‍♀️ Those hiccups aside, the pattern went together perfectly, and was easy to sew except for one part.

The collar.

The collar was the part of the pattern that originally drew me in, because I enjoy making them (not sure what this says about me, but whatevs.) Between the thickness of the fabric and the giant 5/8 seam allowances (which I always leave on during the first run through, just in case I need the extra.) It was a bit of a trick, and I don’t love how the collar turned out because of the bulk, but visually it’s fine. It just feels bulky and I know how bulky it is, so it’s probably all in my head.

So notes for future me (or you, just in case): the bodice is tight. I dislike this feeling, so I let out virtually all of the seam allowances up to a 1/4″–and on princess seams, that’s a lot! If I hadn’t already made some changes and traced it off, I would consider going up a size, but as it is I have plenty of room now and it fits my shoulders nicely. Strangely, for as tight as the bodice is the sleeves are almost too loose even for my big arms. I did snug it up a bit on my forearms, because I had like 3″ of ease flopping around and I wasn’t a fan. The sleeves also were a bit twisty, though I’m not sure if that was a fault of the fabric or me for trying to eek them out of my tiny scrap after cutting it out twice. I also raised the neckline slit, which was recommended by the reviews on PR. Easy to do at the tracing stage, just measure down your front to an amount of skin you’re comfortable with and adjust the lines/markings accordingly.

Overall, I like it, but I’m not sure if it’s something I’ll make multiple times like I had originally hoped. And I definitely don’t think it needs to be made in a heavy knit. An ITY weight jersey should be fine, or at least, that’s what I would try next time. If I try it again, that is.

I tried to reduce the neckline bulk by making the facing out of fusible knit interfacing only. It helped, but still very bulky, and it was exceptionally fiddly.
Closeup of the neckline facing. Super fiddly, (and worse on this than usual, probably because of how beefy this fabric is?) but the results are worth it. I ended up doing some clipping and overlapping on the interfacing to get it wrinkle free and fused flat.
Continue reading

Singer Sphinx 27/127 Restoration part 2

So I’ve disassembled nearly the whole machine, except for the inner bar that runs from hand wheel to needle bar/feed dogs. I can’t get it out, which means that the broken fork won’t come out either (I already have a replacement fork). Based on parts I’ve found online, the bar itself looks to be in rough shape anyway (mine has a groove where the fork sits, and I’m not sure it’s supposed to), so I’m thinking about taking it to the farm to see if my father in law’s plasma cutter can cut it in half without damaging anything else. *But* I don’t want to cut this one until I have both A. Verified that the groove isn’t supposed to be there, and B. the replacement part is in my hands. So between that and fall harvest + wheat drilling, all of my work on this project has been put on hold.

On another note, the Sphinx decals are stupid expensive compared to all the other reproduction decal styles for whatever reason. So my sphinx may become a Celtic knot style or whatever is cheapest if I end up trying out painting it (and it won’t be black either. Currently I’m thinking either metallic royal blue or metallic royal purple. The candy apple red is also a gorgeous option, but I’m getting ahead of myself.)

Leftovers (Simplicity 4076)

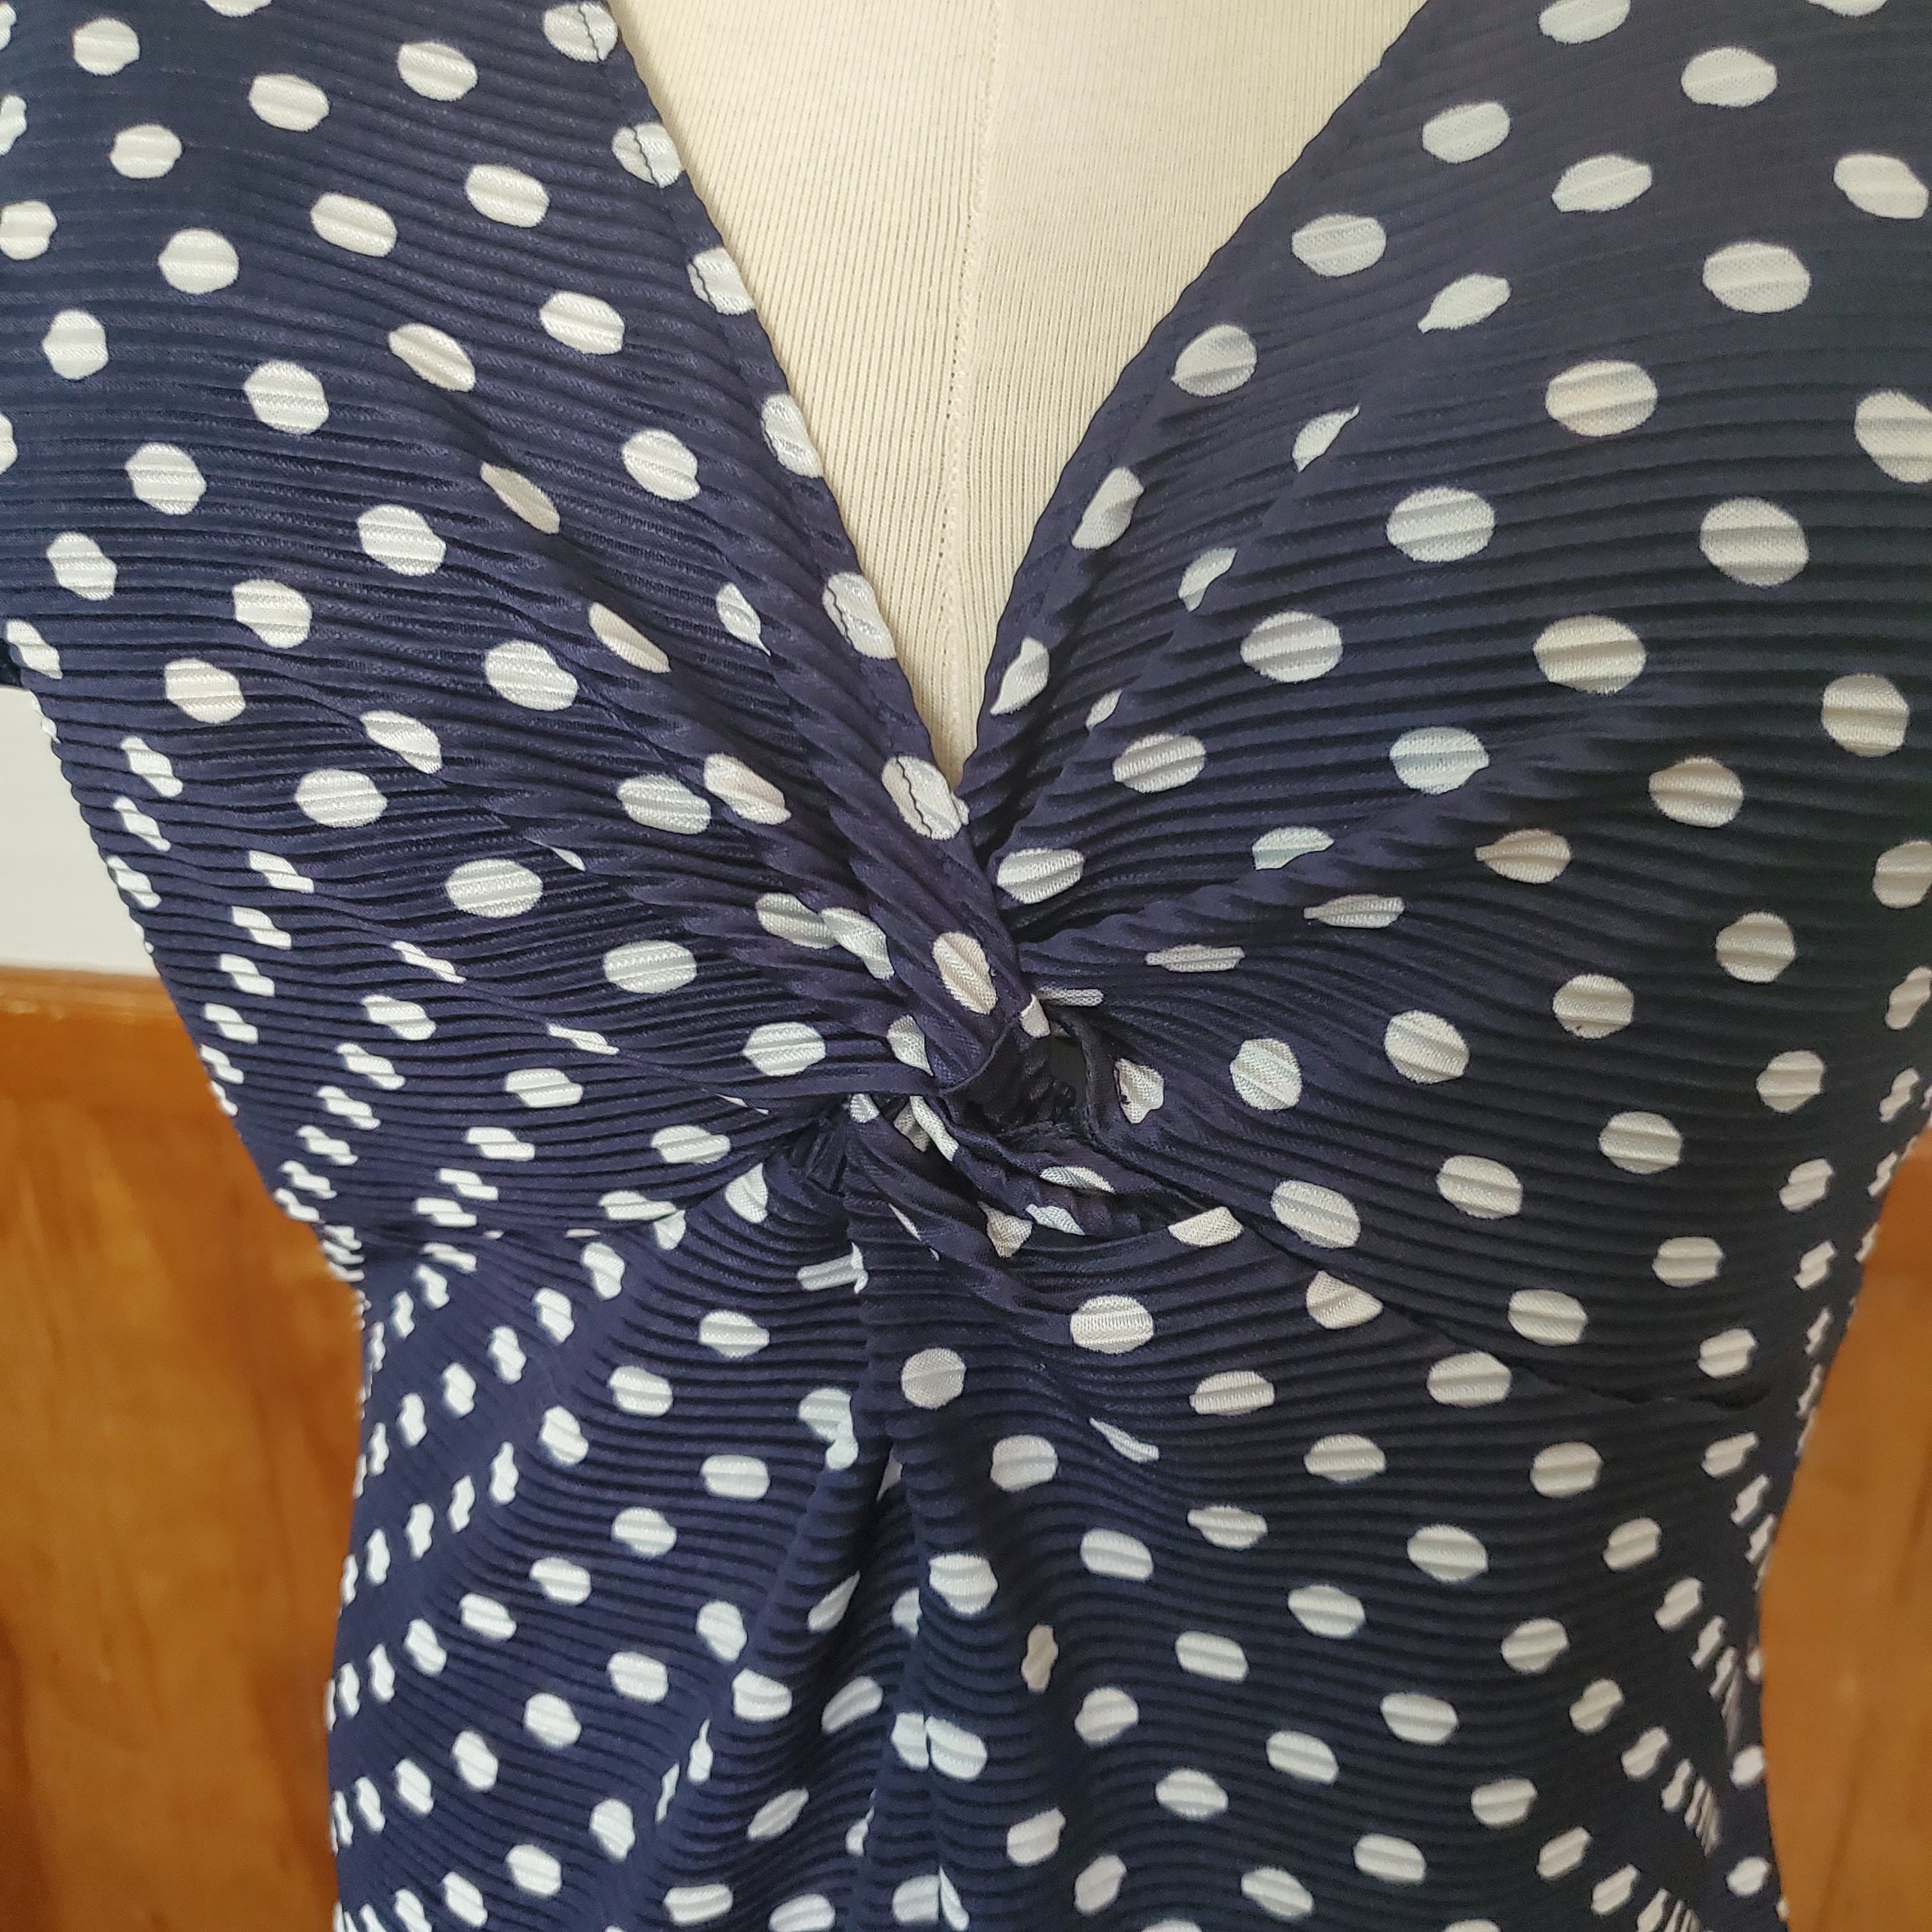
So after the dress I made last post, I had a lot of odd shaped scraps of that crinkly polka-dot fabric left, and I didn’t want to toss them, so I made a blouse. Specifically Simplicity’s 4076, and spoiler; I LOVE it. I didn’t even wash it before it’s first outing.

In my usual fashion though, I couldn’t leave well enough alone and had to make a couple of changes; some fabric related, some fit related.

  • FBA (a bit trickier because of the weird shaped piece, but I probably could have made it easier on myself if I’d have done the next bullet point first.
  • I cut the weird front twisty piece in half. Partly because it fit on my weird scraps better that way, but mostly because the crinkles would have been going the wrong way on part of the bodice, and that would have driven me crazy. This is fairly well hidden in this dark, textured fabric, but doesn’t work as well on lighter fabrics.
  • I flared it at the waist, as I’ve found that shape to be much more flattering on me.
  • I shortened it in the neckline to keep it from being indecent.
  • Flutter sleeves from a different view. I like them because they fit my giant biceps better. 💪 I don’t have little twiggy arms, I have muscular (ok, and a *little* bit flabby) arms.
  • Lazy girl method of taking in the back neckline. AKA I cocked the piece on the fold a little to take out about 1/2″ at the neck. Worked like a charm.
  • Added something like 4″ to the hem. I’m about as short torsoed as they come, and this would have been nearly a crop top on me. I also “mulletized” the back a smidge, adding an extra 2″ in the center back, tapering to nothing at the sides.
  • I didn’t do this, but would next time: add notches to the part where I split the pattern pieces to make lining them up easier.
This is how the pieces are originally oriented in their single piece form, but I changed the grain line of the top when I cut it off and made it perpendicular to the original grain.
Are these not the cutest sleeves?!
Knot a closeup. 😆
Here she is in entirety! I like the subtle flare.

So after this rousing success, I tried it again using all the same techniques on a lightweight rayon knit fabric, and it didn’t work. I think you have to have a knit with one way stretch, and cutting the top piece off on a non textured fabric that was a lighter color showed that seam, which was more noticeable than I was ok with. It may have been because the fabric was more drapey, or just because it was lighter in color, or both, I can’t say for sure. So, just be aware of that if you try it yourself.

NL6211, but barely

My 3rd and final sibling in law finally got married, and I decided that I needed a new dress. A couple of years ago I lost a decent amount of weight, and while I’ve had to work at it to keep it off, I’ve managed to do so for the most part. So I had to get rid of a lot of old clothes, and I’ve been slow to make new ones. I’ve been a fan of New Look 6211 for ages. I’ve even made it once in a woven, the way God….or at least some dude named Suede intended. But I’m more of a knit dress woman, so I made some adjustments and even did the little side cutouts (which ended up really cute, so I’m glad I did!) So if you want your own version in a knit, here’s a list of what I did.

  • FBA. Every time.
  • Took off the waistband.
  • Lengthened the skirt to make up the difference from removing the waistband (completely unnecessary unless you have the legs of a giraffe.)
  • Left out the zipper.
  • Sweetheart neckline (my hubby said he loved the neckline before he said anything else, guess it made an impression.)
  • Made facings for the neckline. Someone might know how to bind a sweetheart neckline, but that person is not me.)
  • I made a binding on the cutouts to help stabilize them. I’d do it again.
  • I added some elastic to the waist seam to help stabilize it too. I’d also do that again.

So it sounds like a lot of changes, and it is, but it isn’t. The hardest part was the overlapped skirt (that you have to partially hem before attaching at the side seams) in a shifty knit and getting the neckline to stay put with all the staystitching and stuff (I’m going to test some heat n bond on the scraps to see if I can get it to stick without messing up the crinkle texture because I wasn’t completely happy with how it laid.) Update: I did the heat n bond, and it seems to work pretty well. I applied it using steam, and held it with my hand once it got cool enough to handle to help it fully set. Still doesn’t lay perfectly flat, but it’s ignorable at this point.

The result? I LOVE it. The side cutout thingys are surprisingly flattering on an apple/goblet/rectangular body shape. The skirt part is going to be made again into just a skirt. I love how swishy and twirly it is. Plus, mullet hems are 100% cooler than mullet hair, and you’ll never convince me otherwise.

Closeup of the fabric. Very cool looking, super lightweight, and hotter than hades. The cutouts make for nice ventilation though. 😉
I did make a small error on the neckline here…my understitching flattened one of the curves a bit. But on the body it’s not noticeable.
I fill this dress out much nicer than my dressform, I promise!

Singer 27 or 127 Restoration Attempt

So, uh, it’s been awhile, eh? I guess you could say that life kind of got in the way. I’ve thought about restarting this blog a time or two, but it just felt awkward, you know?

I’ve had two old treadle machines in my garage for several years now, and in the great garage cleanup of 2021, they just kind of kept being in the way, especially because their stupid casters only roll one way. One belonged to my great grandmother and while it’s cosmetically ok, she’s locked up tighter than Fort Knox. It’s not a Singer though, it’s a Montgomery Ward or something. The second machine, and subject to my clumsy restoration attempt is a Singer 27/127 from 1901. It’s the Sphinx design, and while I’ve seen them beautifully restored, this one is a sad, sad machine. Everything moves like it should, but the bed paint is missing in large chunks, the decals are worn away, and it’s missing the front needle plate. The cabinet is a wreck too, but we’ll get to that later.

Since the Singer is basically trashed, I figured I couldn’t make it worse, so it could be someone’s parts machine if I couldn’t make it look good. I’d also like to make it sew, but one step at a time and all. I’ve got some pics of my progress so far, they are more for my reference, so they’re not aesthetically pleasing or anything. And yeah, this old girl is FILTHY.

I found a blog that has several posts that seems like they might be helpful to myself and anyone who is doing machine restorations. It’s called pungoliving, I’ve tried to link to it below.

As of right now, I’ve got her nearly completely disassembled. I tried to leave components that were grouped together (i.e. the bobbin winder assembly) together for now so that I don’t have to keep track of any more hardware than necessary. I also broke one screw that I think was already cracked. It looked like a poorly made Phillips head screw when everything else is a flat head. So that might be fun. I found the Singer Adjusters Manual for this machine online, and I’ll try to link to it too, if you’re interested.

https://www.manualslib.com/manual/364346/Singer-127.html

I used some Simple Green and some Goop on the paint to see about getting most of the gunk off. Even though I plan to try my hand at painting it I don’t plan to paint the other one, so I am testing out what works best on this one without removing the decals any more than they already are. It looks better, but there is still a lot of sticky discolored spots, and also parts where there the paint (or decades of dirt/oil) crackled.

Until I get an ultrasonic cleaner or something to finish getting all the gunk off, that’s all for now!

Jalie Eleonore, it’s…complicated

I finally got it together and made up a wearable muslin pair of Eleonores, of which I’m surely the last blogger holdout who hadn’t made them before. Now, there are lots of people who sing the praises of these, and while I don’t hate them, after wearing them for a bit, I’m not sure I love them either.

The pattern itself matched up flawlessly. I’m maybe not the most perfectionist about cutting out fabric–I don’t measure for the grainlines or any of that stuff, but I don’t usually have issues and this was no exception. However, if you have even the slightest hint of a butt, you will need to add to the back side. Sorry. That’s maybe my biggest complaint about the pattern itself.

I wear jeans pretty much every day. I hate belts, but it would seem they are a requirement when you have a booty like mine. I have two kids, I need my clothes to move with me, and I have no patience for having to adjust them all the time. All that to get to this point. These don’t have the staying power needed to make them work for me. The elastic isn’t beefy enough to snap the back waistband back to my skin after wear. I wasn’t convinced by the 1″ elastic, but I went with it because that’s what the pattern said to use and also what I had on hand. I did, however, shorten the elastic in the back by a couple of inches, which is probably the only thing that makes them halfway wearable. The denim itself isn’t bagging out yet, but they are already starting to fall down and it’s only been a couple of hours. I will add some belt loops because I desperately need jeans and these fit as well as anything from RTW, but I really wanted a pair of jeans that didn’t need a belt. That’s why I went with these over the Jalie 2908s, well, that and I thought they would sew up significantly faster. But, because I added pockets, the only thing I saved time on was the fly front.

Has anyone else that has sewn these up actually ended up wearing them on a regular basis? And if you did, did you end up using wider elastic? I want to love these belt free, but right now I’m not sure how to get there. Suggestions welcomed!